Click the Admin tab.
Click the User Accounts tab.
Select Group Lists item in the table menu.
Click
the create new group button, ![]() .
.
Enter a unique Group ID.
Select the group account rights.
Click Save button.
Click the Admin tab.
Click the User Accounts tab.
Select Group Lists item in the table menu.
Click
the create new group button, ![]() .
.
Enter a unique Group ID.
Select the group account rights.
Click Save button.
The Groups page allows an administrator to create, edit, copy, and save user groups. You can create user groups and assign specific administrative rights to each group to allow more efficient account management. For example, the administrator can select and save user rights for all radiologists or all physicians as a group, rather than selecting and administering rights individually.
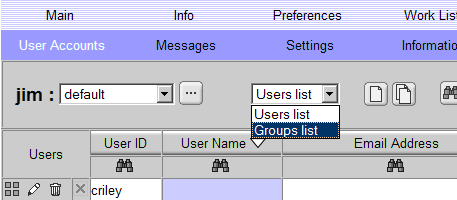
The Groups table is accessible from the User Accounts page. Select the Group List option from the list menu.
Default groups include Administrator, Generalist, Physician, Radiologist, Technologist and Transcriptionist. The user can add to or modify these groups to create new groups.
The
create new group button, ![]() ,
and Filters button,
,
and Filters button, ![]() , operate
the same way they do on the Edit User page. You can view, edit, or delete
groups the same way as you would individual users. See the edit
user account section for details. You cannot copy group settings
from one group to another.
, operate
the same way they do on the Edit User page. You can view, edit, or delete
groups the same way as you would individual users. See the edit
user account section for details. You cannot copy group settings
from one group to another.
Permissions assignable to a group are the same as those available to user accounts. These permissions have the same properties as they do for user accounts. See the user account section for details.
When LDAP is configured on a server, group accounts can select a specific LDAP server or the system as the authentication agent. On the group account edit page, the setting is the Group Authentication Agent field. Group accounts can select the following:
Built In - the system’s authentication software
System default – the system default authentication agent.
LDAP servers (optional) – configured LDAP servers.
The default report editor, defined by the Default Report Editor setting in the Settings page, can be customized for each group from the group account’s edit page by setting the Report Editor setting to one of the following:
Use Default - Use the system default.
Viewer - Use the viewer’s report editor panel.
Browser - Use the report editor web page.
Denying Permissions to Group Members
When assigning permissions to group accounts, the administrator can explicitly deny the group a right. When denied, the right cannot be assigned to a member of that user group from the user account edit page.
To prohibit a user right to a group account, do the following:
When a right is forced off for a group, the permission on the user’s edit page will appear with an X in place of the check box.